Learn the CS2 interface and HUD with this complete guide for beginners. Master radar, killfeed, buy menu, round timer, and more to level up your gameplay.

Stepping into the world of Counter-Strike 2 (CS2) can be both exciting and overwhelming, especially for new players. With sleek graphics, updated mechanics, and a refined user interface, CS2 is designed to give players a competitive edge—but only if you understand how to use the tools at your disposal. One of the most vital tools? The HUD (Heads-Up Display) and interface.
In this guide, we’re breaking everything down for you—from what each HUD element means to how you can use it to dominate your matches. Whether you’re brand new or just switching over from CS:GO, you’ll learn everything you need to play smarter, not harder.
Let’s dig into the HUD and interface layout that defines CS2’s gameplay.
Introduction to CS2 (Counter-Strike 2)
What is CS2 and Why It’s a Big Deal
Counter-Strike 2 (CS2) is Valve’s official upgrade to the legendary Counter-Strike: Global Offensive (CS:GO). Built on the Source 2 engine, CS2 offers smoother visuals, better server performance, and upgraded map lighting and physics. But beyond the graphical improvements, CS2 comes with major changes to gameplay systems—including the HUD and interface—which are crucial for real-time decision-making during intense firefights.
Why is this important?
Because your ability to interpret information instantly—like enemy locations, ammo count, or bomb status—can mean the difference between clutching the round or being the first to fall. CS2’s interface is more polished, yet packed with features that are essential to master.
Whether you’re into casual play or dreaming of going pro, understanding how to read and customize your HUD is step one in becoming a better player.
Transition from CS:GO to CS2
For those coming from CS:GO, you’ll notice a cleaner and more minimalistic HUD, but with more dynamic feedback. Things like killfeed animations, utility outlines, and economic breakdowns are now more readable and accessible.
Key transitions include:
- Updated Buy Menu that categorizes weapons better.
- New killfeed visuals that show kills in real-time with added flare.
- Live utility indicators (smokes, molotovs) on the map.
- Enhanced Radar that adapts based on your position and line of sight.
In short: everything is redesigned for clarity and speed. But you’ll need to invest time understanding what each part of the screen is telling you—and that’s what this guide is for.
Overview of the CS2 HUD and Interface
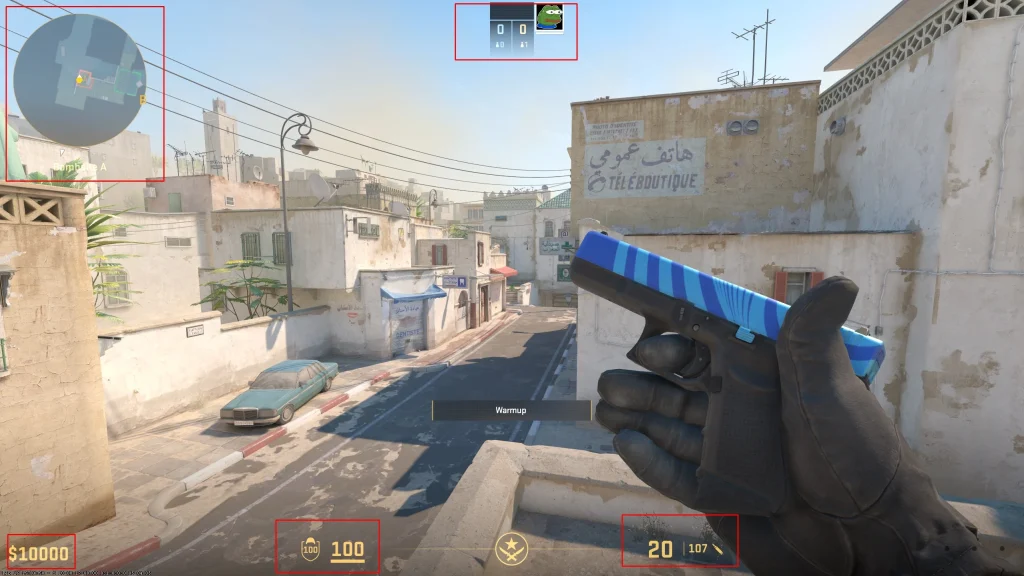
What Does HUD Stand For in CS2?
HUD stands for Heads-Up Display, and in CS2, it’s the collection of on-screen elements that inform you of your status and surroundings without taking you out of the game. Think of it as your combat dashboard—feeding you constant updates so you can react in milliseconds.
It includes:
- Health and armor indicators
- Ammo and weapon display
- Radar
- Timer and round phase
- Killfeed and notifications
- Communication prompts
- Economy information
Unlike some games that clutter the screen, CS2 keeps it tight and efficient. But just because it’s subtle doesn’t mean it’s simple—each HUD element has strategic value.
Main Components of the CS2 Interface
Here’s a high-level breakdown of the primary interface sections you’ll use:
- Top Left: Player health, armor, and utility.
- Top Center: Round timer and bomb status.
- Top Right: Killfeed with real-time updates.
- Bottom Left: Chat and voice/text communication indicators.
- Bottom Right: Current weapon, ammo count, and fire mode.
- Bottom Center: Crosshair and kill confirmations.
- Center Left/Right: Killstreak indicators, MVP, and objectives.
- Tab Menu: Full scoreboard, economy status, team KD, and stats.
Learning to flick your eyes to each of these areas quickly during a fight is crucial—just like checking your mirrors while driving. The more you practice, the more second-nature it becomes.
Top-Left Corner – Player Information
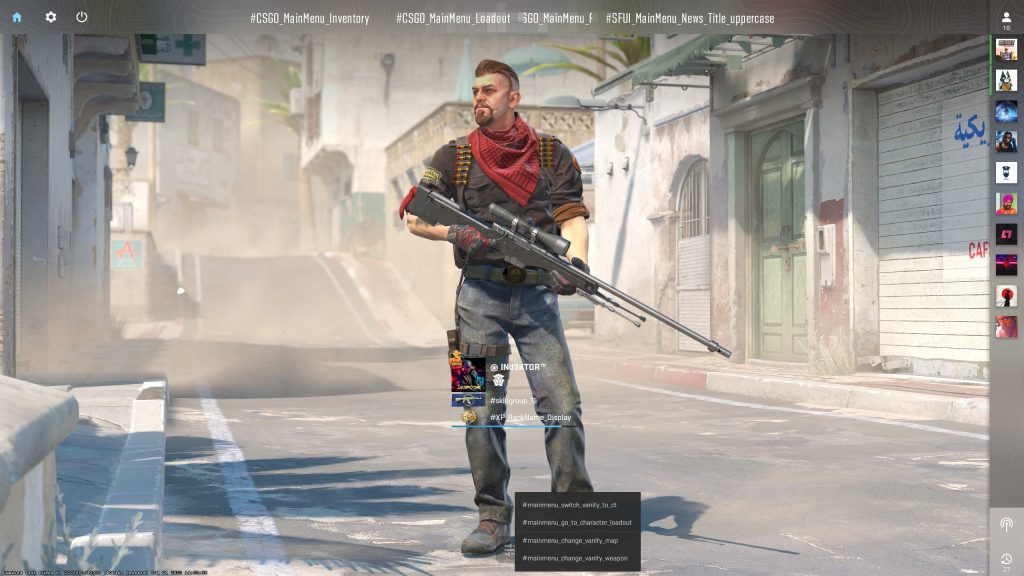
Health, Armor, and Utility Indicators
In the top-left corner, you’ll find your core survival stats:
- Health (HP): Displayed as a white number or bar. Once it hits 0, you’re dead. No regen here—just damage control.
- Armor: If you’ve bought Kevlar or Kevlar + Helmet, this icon shows how much protection you have. Armor reduces damage from bullets and grenades, so never skip it unless you’re broke.
- Utility (Nades, Flash, Smoke): A small icon shows every piece of equipment you’re carrying. Each nade type has its own symbol, and they gray out once used.
Pro Tip: Pay attention to how your armor depletes—it might be worth saving money for the next round if your armor is almost gone and you can’t afford both that and a weapon.
Understanding the Team Panel
Right below or near your health info is the team status bar—a real-time snapshot of how your teammates are doing:
- Teammate names
- Their current weapon
- Whether they’re alive or dead (grayed out if dead)
- If they have bomb or defuse kit
You’ll also see communication cues here—like who’s speaking or pinging. It helps you track who’s still alive without having to hit the Tab key in the middle of a fight.
What makes this section powerful is that it allows you to make snap decisions. See your team wiped out? You may want to play safe. Spot a teammate with bomb near death? Maybe rotate and support.
Master this panel, and you’ll always stay one step ahead.
Bottom-Right Corner – Ammo and Weapon Info
Ammo Count and Reload Status
This part of your screen shows:
- Current magazine ammo
- Remaining ammo in reserve
- Reload icon when mid-reload
The moment you shoot, you’ll see your ammo count tick down. If it turns red, you’re running low. Reload at smart times—not in open areas. A flashing reload icon means you’re dry-clicking, which is basically a death sentence in CS2.
Also, certain weapons show burst or auto-fire mode, letting you toggle between fire styles. Understanding this can drastically improve your accuracy.
Weapon Icon and Active Slot Information
You’ll also see a visual of your active weapon, plus slots for:
- Primary weapon
- Pistol
- Knife
- Utility (grenades)
This section lets you switch weapons confidently without second-guessing. New to CS2? Practice weapon switching until it becomes instinctive—no fumbling in clutch situations.
Bottom-Center – Crosshair and Killfeed

Crosshair Customization and Usage
The crosshair is your aiming guide, and CS2 lets you customize it to your liking—color, shape, gap, thickness, and more. Whether you prefer a static dot or a dynamic reticle, find what works for you.
Pro Tip: Use bright colors like cyan or green for visibility. Avoid colors that blend into maps like Mirage or Dust2.
Real-Time Killfeed and Notifications
Killfeed in CS2 is more animated and stylish than before, showing:
- Who killed whom
- What weapon was used
- Headshots or wallbangs
- Bomb defusals and plants
This gives you tactical awareness. If three enemies die in seconds, you might want to push. If your team gets wiped, maybe fall back and save.
Learning to read the killfeed fast helps with shot-calling and rotations. Don’t ignore it.
Radar (Top‑Left Map Interface)
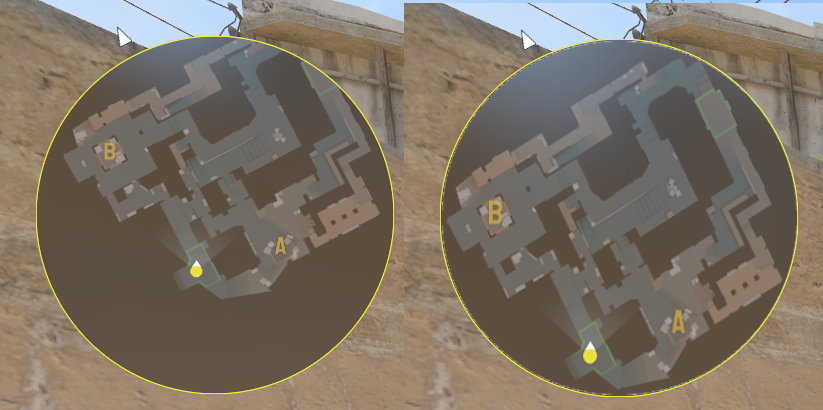
Reading the Radar Efficiently
The radar in CS2 is a small but incredibly powerful tool for spatial awareness. Positioned typically in the top-left (or configurable per your settings), it provides a bird’s-eye view of your immediate surroundings and teammate/enemy positions under certain conditions. But just glancing at it isn’t enough — to use it effectively, you need to interpret what it’s telling you in real time.
Key things the radar shows:
- Teammate locations: You’ll see small arrows (or dots) indicating where your teammates are (if alive). Their facing direction often gives hints about angle coverage or pushes.
- Enemy pings / spotted spots: If a teammate sees an enemy (or pings a location), that information shows up on the radar.
- Bomb icon / bomb site markers: The bomb’s current location or planted status, and T-side/B-side markers.
- Your current orientation & location: You’ll see your own icon (often larger or differentiated) and which way you’re facing.
- Utility effects / barriers: In CS2, smokes, molotovs, or other utility effects sometimes show outlines or indicators when active in zones, giving clues about map control.
To read the radar well:
- Glance, don’t stare: You don’t want to take your eyes off the center movement zone for long, but a quick flick glance can confirm teammate positions, bomb status, or map control shifts.
- Use peripheral glances: With practice, your eyes can dart to the radar peripherally while focusing mainly on crosshair targets.
- Anticipate from what’s not shown: If a part of the radar is blank or shows no enemies, it may be because they’re lurking in unspotted angles or behind smokes. Use that to predict possible rotations or flanks.
- Correlate radar with sound and kills: If you hear footsteps or grenades, check which side of radar they might come from, and cross-reference with killfeed for clues.
One mistake many new players make is ignoring the radar in tense firefights. Every piece of information—no matter how small—can shape your decisions: when to rotate, when to hold, or when to push.
Radar Callouts and Enemy Positions
To make the radar more useful, it helps to pair it with map callouts. If your team refers to “Long A,” “Mid,” “B tunnels,” or “Catwalk,” you instantly know which segment of the radar corresponds to that. Knowing your map’s layout is essential.
Also, a few guidelines:
- Don’t trust static positions too much: Enemies may teleport (metaphorically) via smokes or shortcuts. Use radar data as input, not gospel.
- Watch for enemy “blips” fading: Enemy positions on the radar may flicker or vanish if no longer spotted. That’s your cue they moved.
- Use utility to force radar reveals: Throwing a flash or molotov sometimes forces an enemy to reposition or get spotted, giving you radar advantage.
- Transmit when you see something: If you see movement that isn’t on your radar, ping it or call it out. Your teammates may not see the same thing.
Put simply, mastering radar is like playing multi-dimensional chess: every flick, ping, or fade tells part of the story. The more you practice reading it, the sharper your map sense becomes.
In‑Game Economy Interface

Buy Menu Breakdown
The CS2 buy menu is the gateway to your equipment. Getting to it quickly—and picking the right gear—can determine your round outcome. The buy menu is accessible at the start of each round (during the buy phase) and often via the “B” key (default).
Here’s how the buy menu is structured:
- Weapons categorised: Primary rifles (AK‑47, M4, etc.), SMGs, shotguns, heavier weapons are grouped logically.
- Sidearms / pistol section: Pistols are on a separate tab.
- Utility / grenades: Smokes, frag grenades, molotovs/incendiaries, flashbangs, decoys are all in their own section.
- Armor / defuse kits: Often grouped in a small tab with helmets, Kevlar, and defuse kits (on CT side).
- Quick buy / preset keys: You can assign one-click buys for your common loadout (e.g. “Rifle + armor + 2 smokes + flash”).
- Money display: Your current available cash is shown so you know your spending limit.
When purchasing, you should:
- Decide your role: Are you going rifler, support, or AWPer this round?
- Budget smartly: Don’t overspend early and risk being broke in later rounds.
- Allocate utility: Sometimes a good smoke or flash is more valuable than a fancy gun.
- Check teammates’ buys: Don’t double up too much—if your team has smokes covered, maybe pick a flash or HE.
Managing Your Money Like a Pro
The economy is one of the most strategic components of CS2. Winning or losing often comes down to how well you manage your money across multiple rounds.
Best practices:
- Save rounds (eco / half-buy): Sometimes it’s strategically better to save (spend very little) so you can afford full buys later.
- Force buys: If your team is already down, occasionally a forced buy (spend all money) might surprise the enemy.
- Balance risk and reward: Don’t drop every expensive utility if you won’t live to use it.
- Track enemy economy: If the enemy is clearly broke, push more aggressively. If they have full buys, play more cautiously.
- Don’t bail on teammates lightly: If a teammate is one kill away from recovering, and you have locks to drop, sometimes it’s better to give them that chance.
- Budget by role: Entry fraggers often need full kits; support players might sacrifice a bit of firepower for utility to aid the team.
Understanding economic flow turns CS2 into not just a shooter, but a high-stakes financial chess game.
Scoreboard (Tab Interface)
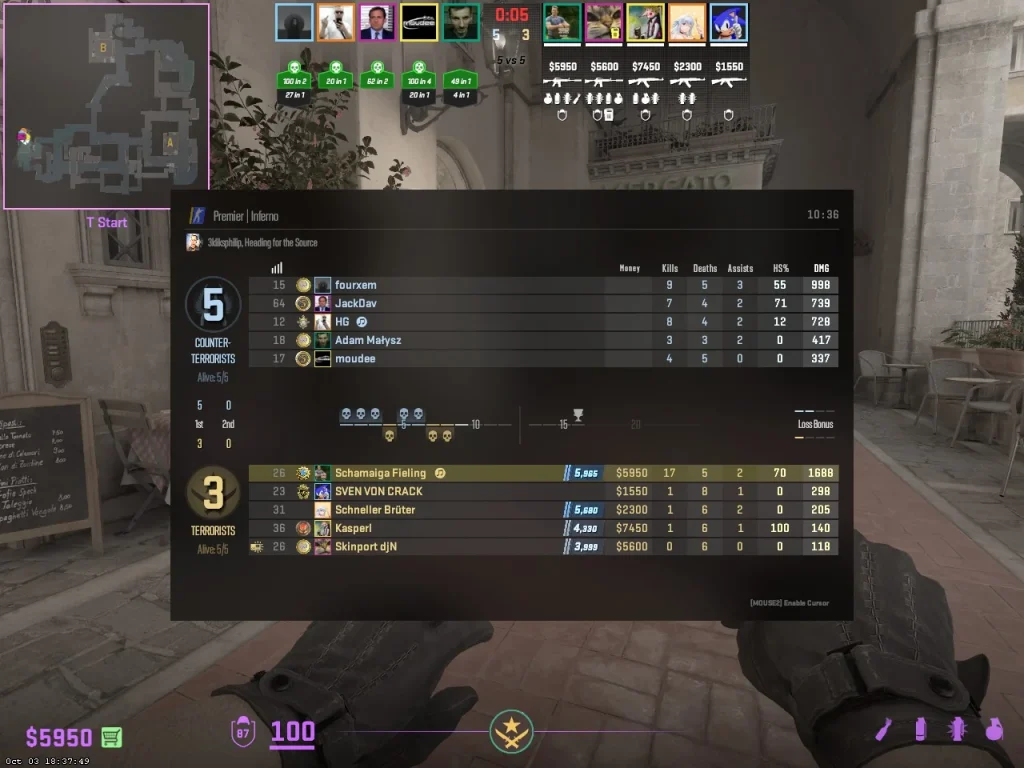
Player Stats and Team Overview
Hitting the Tab key brings up the scoreboard—a complete rundown of both teams and how each player is doing. This isn’t just for vanity; it’s strategic data.
What it shows:
- Player names and avatars
- Kills / Deaths / Assists (K/D/A)
- Score (points for kills, clutches, objectives)
- MVP awards: Number of rounds where players were MVP (often for multikills or performance).
- Utility damage / assists: Some versions include stats for how much damage the player has done via grenades, or assistance via flashbangs.
- Ping / latency: Shows how good each client connection is.
- Team score / round count: Which team is leading how many rounds.
It’s common to glance at the scoreboard mid-round to decide whether to be aggressive (if your team is leading strongly) or conservative (if you’re trailing heavily and need to save).
Ping, K/D/A, MVPs, and Utility Damage
Understanding the deeper stats:
- Ping: High ping means lag; if a teammate has very high ping, their input may be delayed.
- K/D/A:
- Kills and deaths show aggression versus survival capability.
- Assists sometimes indicate smart play (e.g. flashing, supporting).
- MVPs: Winning more than one may highlight players with consistency.
- Utility Statistics:
- If a player has high utility damage or assist contributions, maybe they’re more of a support role—worth adjusting your expectations of their playstyle.
Be careful not to judge strictly by kills. A “low kill, high utility” player might be doing more for the team than an aggressive rusher. Also, communicate with your team: if someone is doing support, don’t criticize them for fewer kills.
Communication Interface (Voice and Text)

How to Use Voice Chat Efficiently
Communication is the lifeline of competitive CS2. The game offers built-in voice chat, but how (and when) you use it makes all the difference.
Best practices:
- Use push-to-talk: Avoid open mic; push-to-talk prevents background noise and chaos.
- Be concise: Say “two B, rotate CT” instead of running long sentences.
- Use callouts: Use standardized map callouts (A long, mid, CT spawn, etc.).
- Voice priority: More urgent calls (e.g. “flash coming”) should interrupt casual talk.
- Mute when needed: If someone’s mic is toxic or distracting, mute them and proceed.
Your communication should be helpful, actionable, and precise. The more your team knows what you see, the better your coordinated efforts.
Pings, Quick Commands, and Team Signals
Besides voice, CS2 offers several quick communication tools:
- Pings on map: You can place ping markers to indicate enemy location, bomb site, or rotate path.
- Quick commands / radial menu: Pre‑set phrases like “Go A,” “Need backup,” “Hold position,” etc.
- Sprays / emojis: These are less strategic but can be used for morale or playful signaling.
- Text chat: For longer messages, but use sparingly—typing takes time.
- Mute / block: Options to mute players or block toxic messages, keeping your focus on gameplay.
Train yourself to ping and use quick commands without breaking your crosshair focus. Seamless communication sets apart good players from great ones.
Round Timer and Bomb Status

Round Phases Explained
The CS2 HUD includes a central timer and indicator which tells you exactly which phase you’re in:
- Buy Phase: Clock runs (~30 seconds). You can purchase weapons, utility, and reposition.
- Action Phase: The main combat phase. Enemies roam, positions are taken, strategies unfold.
- Plant / Defuse Phase: If the bomb is planted, a sub‑timer appears. CT must defuse before time runs out.
- Round End: Once bomb explodes/defused or one side eliminated, screen shows end-of-round summary before the next buy begins.
Understanding which phase you’re in is essential. For instance, you don’t want to rush out in the buy phase without armor or weapons, and chasing a plant after time runs out is futile.
Bomb Timer and Defusal Info
When the bomb is planted, a bomb timer appears — usually centered or shown near the round timer. It shows time left until detonation. As CT, you may see a defusal bar when attempting to disable it (often with a kit, defusal is faster).
Important points:
- Defuse kits speed up your defusal (e.g. from 10 to 5 seconds).
- Every second counts: If defuse bar is blinking or flashing, it means you’re close to failing.
- Multiple view cues: Sound cues for plants / defusal, visual cues for progress.
- Stop defusal if shot: If you’re interrupted while defusing (shot or flashed), the defusal stops — communication or covering fire is essential.
By watching the bomb timer closely, you can decide whether you risk pushing for defuse or play for kills and wait for the timer.
Kill Notifications and Achievement Popups
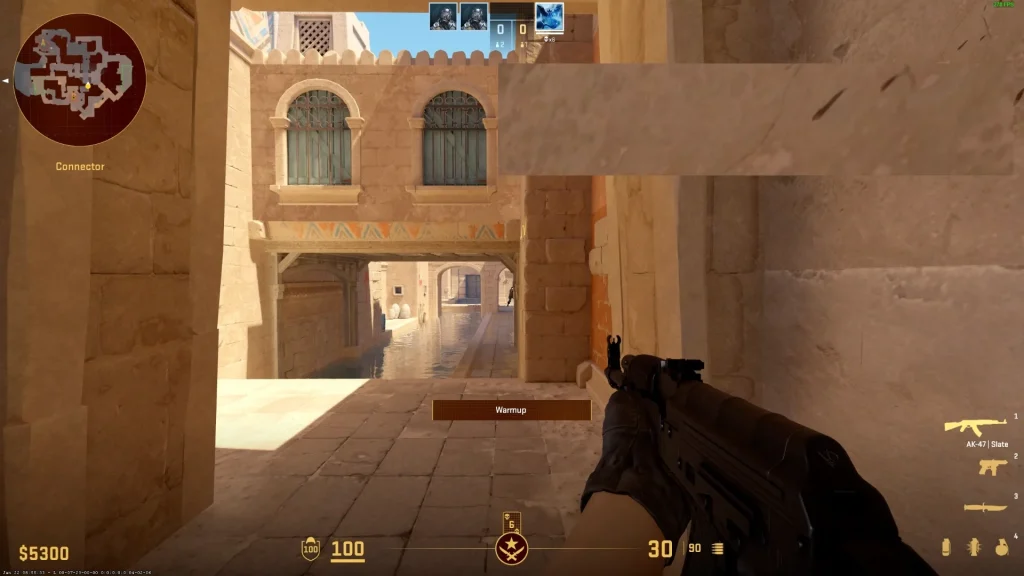
Kill Icons and Sound Cues
Kill notifications are more than just a way to show who eliminated whom—they’re tactical cues that help you react faster and play smarter. In CS2, when someone is killed, a killfeed appears in the top-right corner of your screen, listing the attacker, weapon used, and the victim. Each weapon has a unique icon (AWP, AK-47, Deagle, etc.), making it easy to tell what just happened—even without reading names.
Here’s what you can identify in the killfeed:
- Weapon used: Quickly lets you know if the enemy has rifles, snipers, or pistols.
- Type of kill: A headshot is often marked with a skull or red icon.
- Grenade and utility kills: Unique icons for molotov, HE grenades, and knife kills.
- Team kills: These appear with a red highlight or icon to indicate a misplay.
- Double, triple, and ace notifications: Some feeds show multi-kill badges, especially in competitive and replay modes.
But what’s even more critical than the icon is the timing. If you see two quick kills pop up from the same enemy, your team might be in trouble. If you see an AWP kill from long A, maybe it’s time to rotate or flash.
And then come sound cues. CS2 offers distinct kill confirmation sounds when:
- You kill an opponent.
- You land a headshot.
- You assist in a kill (especially when using utility).
These help you track your performance without taking your eyes off the screen. You hear that “ding”? That’s a headshot. If you hear two, it might be a collateral. Combine sound and visual notifications to stay ahead of your enemies.
Achievement Popups and Match Events
Another part of the interface that many players overlook is the achievement popup system. These are small notifications that display on the side or bottom of your HUD when you:
- Get your first kill of the round.
- Plant or defuse the bomb.
- Get an ace (eliminate the entire enemy team alone).
- Win the round MVP.
- Deal significant utility damage or clutch a round.
In CS2, these are more subtle but still helpful. You might see:
- “Ace!” – When you get all five kills in a round.
- “Bomb Defused!” – With your player name.
- “Round MVP” – Highlighting your contribution to the win.
They serve as a morale booster but also as an information source. If your teammate just got an ace, it might be time to support them in the next round with a dropped weapon or call for a strategy around them.
These alerts can also motivate clutch plays—like when you see “Last Alive” notification and the pressure hits. They’re more than just flair—they’re integral to tracking momentum and understanding your impact.
Settings and HUD Customization

How to Customize HUD to Your Style
CS2 doesn’t believe in a “one-size-fits-all” HUD. Instead, you can tailor nearly every element to suit your playstyle and visual comfort.
Here’s how you can customize it:
- Crosshair Settings: Adjust size, color, shape, dot presence, dynamic/static behavior.
- HUD Scale: Increase or decrease the size of interface elements based on monitor and resolution.
- Radar Options: Adjust zoom, rotation (static vs. rotating), transparency, and size.
- Color Themes: Choose between team-based or custom color schemes for clarity.
- Transparency / Fade Timings: Fine-tune how long killfeed or notifications stay on screen.
- Buy Menu Preferences: Enable fast-buy, show suggested loadouts, or organize items differently.
In CS2, most of these are available in the Settings → Game → HUD tab, but advanced users can go even deeper with config files and console commands.
Tips for setting it up:
- Use contrasting colors that stand out (like cyan, yellow) for your crosshair and HUD elements.
- Keep killfeed duration short if you want a cleaner screen, or longer if you rely on it heavily.
- Simplify radar to focus on close-range awareness if you’re a fast-entry fragger.
- Customize weapon viewmodel position (via console) to declutter center screen while aiming.
Take time to experiment. A personalized HUD gives you better visibility, faster reactions, and less eye strain.
Recommended HUD Settings for Beginners
For new players, here’s a solid starting point:
- HUD Scale: 0.9 (small enough for focus, large enough to read)
- Radar Zoom: 0.6 to 0.7
- Radar Rotate: On (helps orient direction)
- Crosshair: Static, cyan, medium size with slight gap
- Killfeed Duration: 8 seconds
- Buy Menu Layout: Grid mode with labeled sections
- Weapon Viewmodel: Set to lower-right or “classic” for a clear center view
And remember: your setup should enhance gameplay, not distract. If something feels cluttered or confusing, tweak it.
Spectator and Replay Interface
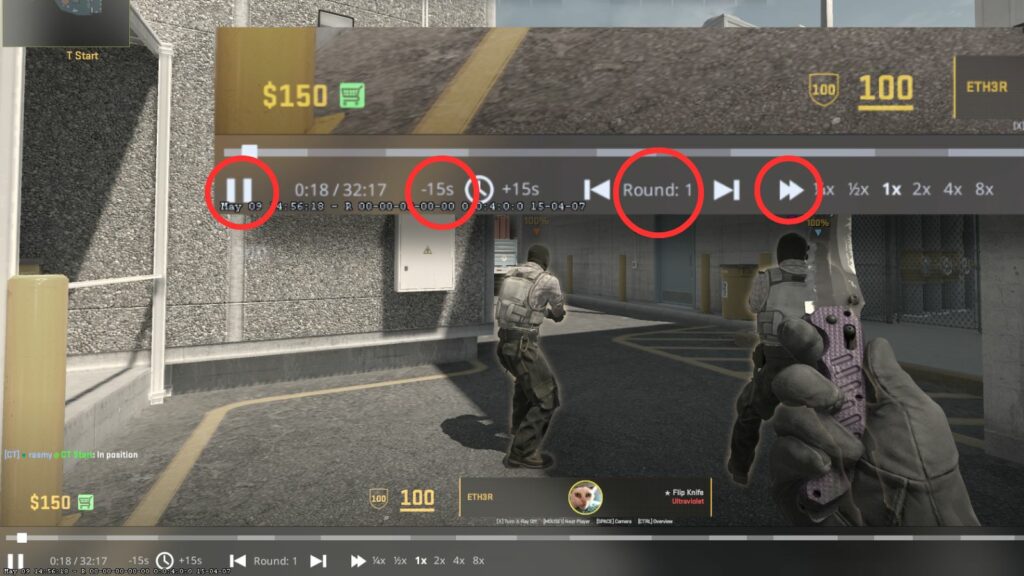
Observing Other Players
When you die in a round, or are watching replays, CS2 switches you into spectator mode. This interface is extremely useful—not just for entertainment, but for learning and strategizing.
In spectator mode, you get:
- Live minimap with player tracking
- Health, armor, and utility of each player
- Current weapon and ammo
- View from player’s POV or freecam
- Killfeed and round timer remain visible
While spectating, you can:
- Learn better angles and crosshair placements.
- Understand rotation timings.
- Watch how better players use utility smartly.
- Predict mistakes and fix your own playstyle.
Whether in casual games or watching a friend clutch a 1v3, the spectator mode lets you soak up game knowledge passively.
Learning from Replays and Demos
CS2 includes replay functionality via the “Watch” tab or demo commands. By downloading and watching your match:
- You can see every round from any player’s POV.
- Use x-ray mode to spot common hiding spots or rotations.
- Pause and rewind key moments for breakdown.
- Identify your own movement mistakes or mis-aims.
- Track how enemy players read your team’s behavior.
Watching replays isn’t just for fun—it’s like studying game tape in sports. Especially if you’re serious about climbing ranks, reviewing your own plays is a game-changer.
Even 10 minutes of watching your match afterward can reveal blind spots, overpeeking habits, or poor spray control you missed in the moment.
Tips for Mastering the CS2 HUD Quickly

Practice with HUD Awareness
Mastering the HUD means building muscle memory. You shouldn’t have to “think” about checking the radar or killfeed—it should happen automatically.
Try these drills:
- Radar flicks: Periodically glance up during movement transitions to build habit.
- Health checks: After every firefight, quickly check your health and armor to decide whether to push or play safe.
- Ammo discipline: Look at your bullets before rounding corners. Never reload mid-fight.
- Communication sync: Tie what you see on the HUD (enemy kills, flash indicators) to what your team is saying.
Like learning to drive, you first consciously check mirrors—then eventually, you do it instinctively. Same goes for the CS2 HUD.
Using HUD to Gain Competitive Advantage
What separates good players from great ones isn’t raw aim—it’s how they process information. The HUD gives you more than visuals. It provides:
- Timing
- Spacing
- Risk evaluation
- Enemy tendencies
Examples:
- If radar shows no teammate mid, you’re the only one watching it.
- If killfeed shows enemy AWPer down, it’s your time to peek.
- If bomb is dropped on radar, your entire strategy shifts.
Make your HUD work for you. Every flick of the eye should deliver clarity, not confusion.
Common Mistakes New Players Make with the Interface
Ignoring HUD Clues
This is probably the #1 mistake among new players: they tunnel vision. They focus on what’s directly in front of them and miss critical HUD signals like:
- Low health (pushes when they should hide)
- No armor (dueling against rifles)
- Bomb status changes
- Flashbangs on radar
- Utility left on teammates
Ignoring these costs rounds—and gets teammates salty. Don’t let the info go to waste. The HUD is designed to guide you. If something flashes or pops up, it’s probably important.
Misreading Radar and Timers
Radar and timer misreads can derail even a well-planned round. Common blunders include:
- Rushing B at 10 seconds left with bomb in spawn.
- Thinking a site is clear when no teammate has pushed it.
- Defusing without kit when time won’t allow it.
- Thinking you have enough time to rotate when you don’t.
Fix these by:
- Practicing radar awareness every match.
- Learning exact timings for maps (e.g., how long to rotate from A to B).
- Keeping the round clock in your peripheral vision.
These are avoidable mistakes—and mastering them means you’ll be ten steps ahead of the competition.
Conclusion
Mastering the CS2 interface and HUD isn’t optional—it’s a core skill. The HUD is your command center, your battle plan, and your teammate all rolled into one. Whether it’s watching radar for a lurking enemy, reading the killfeed to spot openings, or customizing your HUD for faster reactions, every pixel matters.
As a new player, the difference between flailing and fragging often lies not in your mouse skills, but in how well you read and react to the info on screen. Learn it. Practice it. Own it.
With a well-tuned interface and sharp HUD awareness, you’re not just playing—you’re commanding the battlefield.
FAQs
How do I reset my CS2 HUD settings?
You can reset HUD settings by going into Settings → Game → HUD and clicking “Reset to Default.” For full reset, use launch options or delete your config file in your game folder.
Can I move HUD elements in CS2?
Not directly via UI, but some elements can be repositioned using console commands or config edits. For full customization, use community HUDs via Workshop or advanced config tweaks.
Why is my radar not showing teammates?
Your radar settings might be misconfigured. Go to Settings → Game → Radar and enable “Show Teammates.” Also ensure zoom isn’t too far out, making icons too small.
What’s the best HUD color setting?
It depends on map contrast and visibility. Bright colors like cyan, yellow, or lime green work best. Avoid red or dark blue as they can blend into shadows.
How do I know how much money my team has?
Hold Tab to open the scoreboard. You’ll see your teammates’ current money listed. Use this info to plan eco or full-buy rounds effectively.
