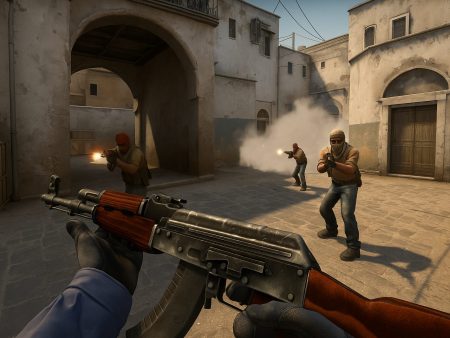
Optimize your CS2 setup with this complete 2025 guide. Learn the best settings for FPS, crosshair customization, config tweaks, launch options, and pro tips to dominate in CS2.
If you’re serious about climbing the ranks in CS2 or just want the smoothest gameplay possible, your settings are your foundation. Whether it’s squeezing out those extra frames per second (FPS) or setting up the perfect crosshair that locks onto heads, every detail matters. Unlike casual games, CS2 is an ultra-competitive shooter where milliseconds can make the difference between a clutch or a crushing defeat. Optimizing your game settings isn’t just for pros—it’s for anyone who wants to perform consistently at their best.
CS2 has evolved far beyond its predecessor, CS:GO, bringing a whole new Source 2 engine with enhanced visuals, lighting, and physics. But with great graphics comes greater strain on your system, which is where fine-tuning your performance settings comes into play. Even with a powerful rig, default settings won’t guarantee peak performance.
Not to mention, personalizing your crosshair, HUD, and mouse sensitivity helps you become more comfortable and precise. Familiarity equals confidence, and confidence translates into better performance. You don’t want to be second-guessing your crosshair placement or adjusting to new settings mid-match.
This guide is your one-stop destination to optimize everything—from raw FPS to radar settings. We’ll walk through detailed recommendations, explain technical jargon in plain English, and even sprinkle in tips from the pros. Ready to turn your setup from average to elite? Let’s dive in.
Differences Between CS:GO and CS2
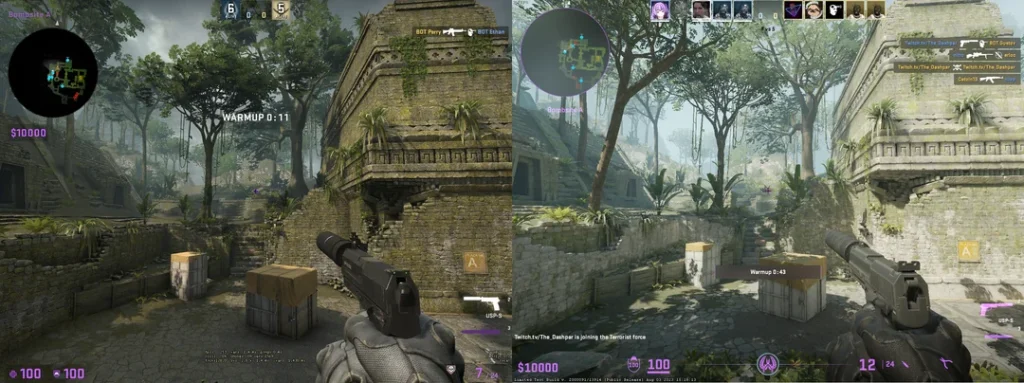
At first glance, CS2 might look like a polished version of CS:GO, but the changes run much deeper than visuals. The Source 2 engine brings significant upgrades in lighting, shadows, and smoke physics, which can dramatically affect your system performance—and gameplay.
One of the most noticeable changes is dynamic smoke. Unlike CS:GO’s static clouds, CS2 smokes react to gunfire, movement, and light. While cool, they’re also demanding on your GPU. Map details are richer, surfaces reflect more light, and the overall aesthetic feels more “alive.” All these enhancements mean you’ll need to tweak your settings even if CS:GO ran smoothly for you.
Beyond graphics, UI changes are another big shift. The buy menu, HUD layout, and scoreboard have been redesigned, requiring players to adjust to new visuals and navigation. The radar now uses a more vibrant palette, and the settings menu offers more customization but in a slightly different format.
Performance-wise, CS2 is a mixed bag. Some users report better FPS, while others experience drops—especially on older hardware. That’s why understanding what each setting does and how it impacts gameplay is essential.
There’s also a new input system that feels slightly different, even if sensitivity settings carry over. Hit registration feels more accurate, but that depends heavily on ping and interpolation settings, which we’ll cover later. So, even if you’re a CS:GO veteran, don’t assume you can use your old setup and dominate. CS2 requires a fresh optimization approach.
Best Performance Settings for High FPS
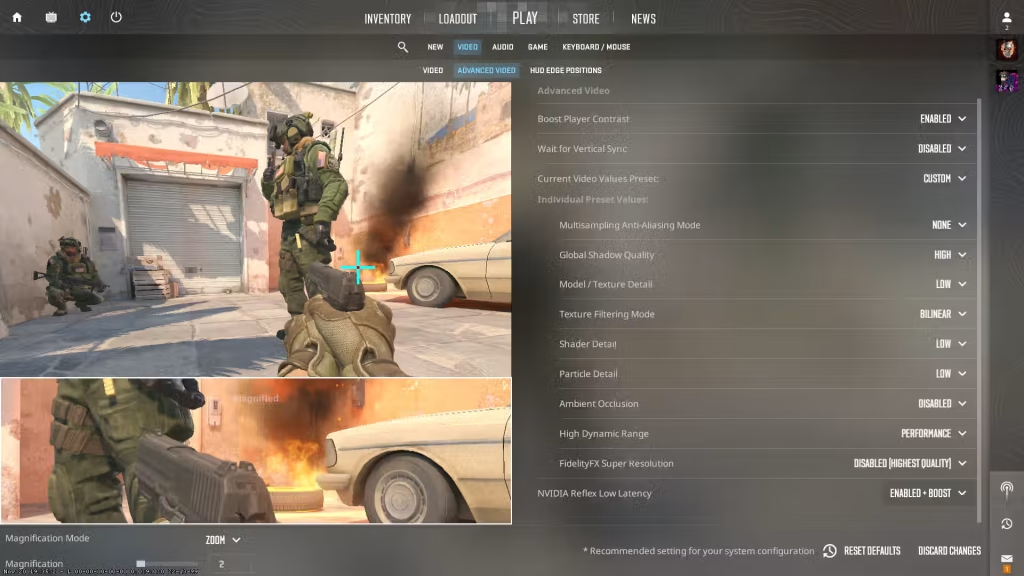
Video Settings for Maximum FPS
When it comes to CS2, performance is king. You can’t land headshots if your screen is stuttering or your frames are dropping mid-fight. The good news? With the right settings, even a mid-tier rig can push consistent 200+ FPS. Let’s break down what you should prioritize.
First off, drop your Resolution only if absolutely necessary. Most competitive players stick to 1280×960 or 1024×768 stretched for better visibility and higher FPS. Stick with a 4:3 aspect ratio, even on wide screens—it increases character models’ width, making enemies easier to spot.
Set Global Shadow Quality to Low. Shadows eat up a ton of performance for very little gain competitively. Model / Texture Detail should be Low or Medium, depending on your GPU. Shader Detail can be set to Low, and Particle Detail doesn’t need to be high unless you’re streaming or making content.
Turn off Boost Player Contrast if you’re really scraping for frames, though it can help with visibility. Anti-Aliasing? Set to None or 2x MSAA. Anything higher is unnecessary. Multisampling also doesn’t need to be high—it affects FPS more than visual clarity.
Make sure V-Sync is turned Off. It introduces input lag, and that’s a death sentence in CS2. Motion Blur? Off. Ambient Occlusion? Off. FidelityFX Super Resolution (FSR) should be set to Performance Mode if you’re struggling.
Ultimately, every setting you lower should be for smoother performance, not just higher numbers. Keep your FPS consistent rather than chasing spikes—it’s better for aiming and muscle memory.
Nvidia/AMD Control Panel Tweaks
Your in-game settings aren’t the only place you can boost performance. The Nvidia or AMD Control Panel has some hidden gems that can make CS2 run smoother. Let’s start with Nvidia.
In Nvidia Control Panel, go to Manage 3D settings, and under Program Settings, add CS2 (or CS:GO.exe if it’s still named that). Then make the following changes:
- Power Management Mode: Set to Prefer Maximum Performance
- Low Latency Mode: Turn On or Ultra for better responsiveness
- Texture Filtering – Quality: Change to High Performance
- Vertical Sync: Force Off
- Threaded Optimization: Leave On
Also, disable G-Sync unless your monitor handles it exceptionally well—many players report input lag using it.
For AMD users, go into Radeon Settings > Gaming > CS2, and:
- Set Anti-Aliasing Mode to Use application settings
- Texture Filtering Quality to Performance
- Enable Radeon Chill if you want to cap FPS without third-party tools
- Turn Wait for Vertical Refresh to Off
These tweaks bypass CS2’s internal controls and give your system a bit more breathing room. Combined with in-game changes, this can add 30–50 extra FPS easily.
Windows Optimization for CS2
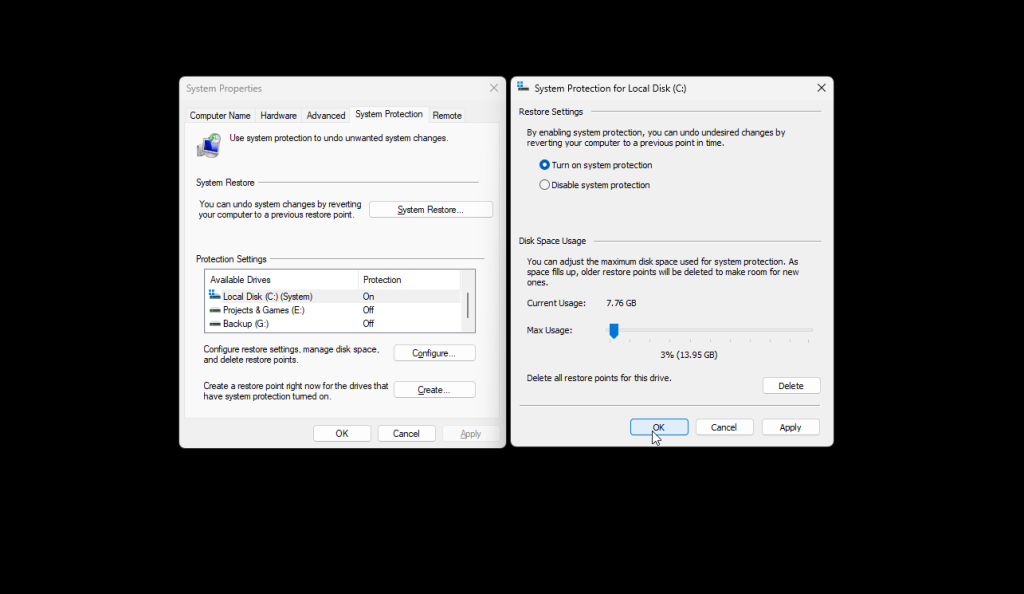
Even if you have a great GPU and a fine-tuned in-game setup, background processes and poor system settings can bottleneck CS2. Here’s how to give Windows a performance boost for CS2.
First, set your Power Plan to High Performance. Head to Control Panel > Hardware and Sound > Power Options, then choose the High Performance plan. This prevents your CPU from throttling under load.
Next, disable unnecessary Startup Programs. Press Ctrl + Shift + Esc to open Task Manager, click on the Startup tab, and disable any software that doesn’t need to run while gaming—like Discord overlays, RGB software, and cloud sync tools.
Also, disable Game Mode. While it sounds helpful, it can interfere with CS2’s performance by prioritizing background Xbox services. Go to Settings > Gaming > Game Mode and toggle it Off.
Disable Hardware-Accelerated GPU Scheduling (Settings > System > Display > Graphics > Change Default Graphics Settings) unless you’re using the absolute latest NVIDIA RTX cards.
Lastly, keep your GPU and motherboard drivers up to date, and ensure Windows Updates don’t run during matches. These small steps will dramatically improve your CS2 experience.
In‑Game Video Settings Breakdown
Resolution and Aspect Ratio
One of the very first choices you make in CS2 (and any competitive shooter) is your resolution and aspect ratio. These influence not just how sharp the game looks, but how big enemy models are on your screen, how easily you spot them, and how smooth the game performs.
- Native Resolution vs Lowered
If your system can handle it, running the native resolution (e.g. 1920×1080) gives you crisp visuals. But if performance drops, it’s better to drop resolution to maintain consistency. A fluctuating FPS is worse than a lower constant FPS. - 4:3 Stretched / 4:3 Black Bars / 16:9
Many competitive players pick 4:3 stretched—it compresses horizontal space and makes player models appear wider and more visible (though somewhat “fatter” in shape). Others prefer 4:3 with black bars, which maintains correct proportions but still gives a performance edge. 16:9 gives the full widescreen view but is harder to optimize for high FPS. - Common Resolutions
- 1024×768 (4:3)
- 1280×960 (4:3)
- 1440×1080 (4:3)
- 1920×1080 (16:9)
The sweet spot for many mid-tier systems is 1280×960 or 1440×1080—good balance between clarity and speed.
In short: go with the lowest resolution you’re comfortable with visually, and the aspect ratio that helps you see targets easiest. Always aim for stable frame rates over sharpest image.
Texture, Shader, and Detail Settings
Once resolution is set, the next big performance hitters are texture, shader, and model detail settings. Let’s break down the major ones:
- Texture / Model Detail
Textures are images applied to surfaces (walls, players, objects). Models are the complexity of 3D shapes. High values look better but eat VRAM and GPU power. For competitive play, Low or Medium is usually ideal—good enough visuals, minimal performance cost. - Shader Detail
Shaders are how lighting, reflections, and special effects (such as glows, flickers) are drawn. Set Shader Detail = Low or Medium unless you have plenty of headroom in GPU usage. Lowering these often yields noticeable FPS gains with small visual loss. - Particle Detail / Effects
These settings control explosions, smoke density, sparks, etc. Lowering Particle Detail is especially useful on maps with heavy effects (grenades, fire). Use Low or Medium so effects don’t lag frames or obscure your vision. - Global Shadow Quality / Ambient Occlusion
Shadows and occlusion effects (darkness under objects) add depth visually but are performance-heavy. Set Shadows = Low or Off and Ambient Occlusion = Off for smooth competitive gameplay. Shadows rarely help you see enemies; they mostly cost FPS. - Motion Blur, Depth of Field, and Lens Effects
All these are cosmetic flourishes. Turn Motion Blur = Off, Depth of Field = Off, and disable any Lens Flares / Bloom unless you like pretty visuals more than stable performance. - Anisotropic Filtering & Anti-Aliasing
- Anisotropic Filtering improves texture clarity at angles. Use 2× or 4× if your hardware supports it—don’t go max unless your system can spare it.
- Anti-Aliasing (AA) smooths jagged edges. But high AA settings harm performance. Use None or 2× MSAA at most for competitive settings.
By tuning these, you reduce visual “noise,” get better FPS, and maintain clarity where it counts (players, weapons, movement). Keep it clean, keep it fast.
Anti‑Aliasing, V‑Sync, and FX Settings
These fine-tune how the game looks and feels, especially in intense moments.
- Anti‑Aliasing (AA)
As above, stick to None or 2× MSAA. Higher filters (4×, 8×, FXAA) create soft edges but cost FPS and can blur distant enemies—bad tradeoff in a shooter. If you have headroom, try 2×; if not, turn it off. - Vertical Sync (V‑Sync)
Always turn V‑Sync = Off in competitive shooters. While V‑Sync helps prevent screen tearing, it introduces input lag (delay between your mouse movement and action on screen). That delay can be the difference in a clutch round.
If your GPU outputs far more FPS than your monitor refresh rate, use other methods (like frame caps) instead of V‑Sync. - Frame Rate Limit / FPS Cap
Capping your FPS slightly above your monitor’s refresh rate (e.g. 10–15 fps more) can give stability and reduce stutters. Use console commands or in-game caps (if available). For example, if you have a 240 Hz monitor, capping at 260–270 FPS can reduce fluctuations. - FX / Special Effects
Effects like bloom, glare, lens flares, distortion are nice visually but interfere competitively. Disable FX or set it to Low / Off so that the screen stays clear, especially when smoke or flash grenades appear. - Dynamic Lighting / Ambient / Global Illumination
In CS2, lighting is more advanced. Lower these settings to Low / Medium. The real competitive benefit is reducing the GPU strain. - FidelityFX Super Resolution (FSR)
If CS2 supports it, set FSR to Performance / Balanced mode. This will internally render at a lower resolution and upscale, boosting FPS without a huge visual hit—especially helpful on lower-end GPUs.
These settings—AA, V‑Sync, FX—are among the last ones you adjust after you’ve nailed overall resolution and detail settings. They fine-tune your performance quality and help with stable, input‑responsive gameplay.
Crosshair Customization Guide
Types of Crosshairs in CS2
Your crosshair is your visual anchor in a firefight—it’s how you aim, track recoil, and align shots. CS2 typically supports multiple crosshair types:
- Static Crosshair
A fixed shape that does not expand or contract with movement or firing. This is good for players who like consistency and rely on muscle memory. - Dynamic / Classic Crosshair
The crosshair expands or contracts depending on movement or firing—gives feedback on your accuracy (i.e., when your aim is less accurate). - Dot Crosshair
A simple dot in the center—minimal distraction, maximizes visibility. Great if you prefer very precise aiming without lines. - Hybrid / Custom Crosshair
Some draw both lines and a center dot or allow color / gap / thickness customization. Most players like this hybrid style.
CS2’s crosshair system is more flexible than CS:GO’s. You can often tweak color, transparency, thickness, gap, outline, and dynamic behavior.
Best Crosshair Settings for Accuracy
The “best” crosshair is subjective—what feels natural to you is more important than copying someone. Still, there are some commonly used settings among competitive players:
- Color / Visibility
Choose a color that stands out against most map backgrounds: Neon Green, Cyan, Yellow, Bright Red. Avoid whites or light grey—they blend in accidentally. Also use an outline / border to ensure visibility over dark or bright backgrounds. - Thickness / Length / Gap
- Thickness: Keep it low (0.5–1.5) so your view isn’t cluttered.
- Length: Moderate values (6–10) are good—too long and it distracts; too short and you lose reference.
- Gap: The spacing between center lines is crucial. Too small, and it obscures targets; too big, and you lose precision. Many prefer a gap around 2–4 units.
- Dynamic vs Static
If you’re disciplined with movement and tapping, a static crosshair works great. If you want visual feedback about accuracy, a dynamic crosshair helps you see when your shots may be inaccurate (e.g. when moving or firing full auto). - Outline / Border
A subtle dark border around your crosshair makes it visible over any background. Use minimal thickness so it doesn’t blur the core lines. - Alpha / Transparency
Keep your crosshair fully opaque when aiming but allow slight transparency when running. Some players use a fade effect so it’s less distracting when not shooting. - Position & Offset
If supported, make sure your crosshair is exactly centered and not offset by HUD or screen scaling issues.
Importing Pro Player Crosshairs
Want to try a pro’s crosshair? Many top CS2 players publish their settings or config files. Here’s how to import their crosshairs safely:
- Find the Config / Crosshair Code
Many pros publish a single line (or lines) of console commands likecl_crosshairsize 5,cl_crosshaircolor 2, etc. Sometimes they publish a.cfgfile you can download. - Open or Create an Autoexec / CFG File
Use a text editor (Notepad++) and either add to yourautoexec.cfgor another config file. - Paste the Commands
Paste all crosshair-related commands (those that begin withcl_crosshair...). Make sure there are no conflicting entries (i.e. two differentcl_crosshairsizelines). - Execute / Bind
In-game console, runexec autoexec(or the name of your config) to apply. You may also bind it to a key likebind “F10” “exec my_crosshair.cfg”for quick switching. - Tweak Slightly to Fit Your Setup
What works on someone else’s 240 Hz monitor and resolution might need adjustments for you. Tweak gap, thickness, or color as needed to suit your screen.
Be careful not to copy over every single setting blindly—only import the crosshair part unless you deliberately want the full config (which may conflict with your hardware).
Config Files and Autoexec Setup
What is an Autoexec File?
An autoexec.cfg is a plain-text file that contains console commands you want to run automatically every time CS2 starts (or each time you manually execute it). It’s extremely useful because:
- It ensures your preferred settings load automatically.
- It allows you to store custom binds, crosshair commands, sensitivity tweaks, and performance settings in one place.
- You avoid manual reconfiguration every time settings reset or updates occur.
It’s like having a custom profile: instead of clicking through menus, you launch the game and boom—your perfect settings load automatically.
How to Create and Use autoexec.cfg
Here’s a step-by-step:
- Locate the Config Folder
It’s usually in your CS2 installation directory. For example:
…\Steam\steamapps\common\Counter-Strike 2\cs2\cfg\
Create the File
Using a text editor (Notepad, Notepad++), create a file named autoexec.cfg in that cfg folder (if it isn’t already there).
Add Commands
Paste your custom console commands. You can group them into sections like:
// Performance tweaks
fps_max 0
mat_queue_mode 2
// Crosshair
cl_crosshairsize 5
cl_crosshaircolor 2
// Binds
bind “F5” “buy ak47; buy m4a1”
Ensure It Executes Automatically
Add a line in a default config.cfg or in your launch options to run it:
exec autoexec.cfg
- Or in launch options:
+exec autoexec.cfg. - Prevent Overwriting
In yourconfig.cfgor any default settings file, make sure the linehost_writeconfigdoesn’t override your autoexec (or placeexec autoexec.cfgat the bottom). - Test It
Launch CS2, open console, typeexec autoexec.cfgand make sure commands applied. You can also place a test command likeecho “Autoexec executed!”to verify.
Best Config Commands to Boost Performance
Here’s a curated list of commands you’ll often see in high-performance configs. Use with care—research each if unsure.
| Command | Purpose / Effects |
|---|---|
fps_max 0 | Removes frame cap (unless overridden) |
mat_queue_mode 2 | Enables multithreaded rendering |
r_dynamic 0 | Disable dynamic lighting |
r_shadowrendertotexture 0 | Turn off shadows rendering to textures |
cl_forcepreload 1 | Preload assets to reduce stutter mid-round |
snd_mixahead 0.05 | Reduce audio latency |
cl_interp 0 / cl_interp_ratio 1 | Tight interpolation settings |
cl_updaterate 128 | Maximum updates per second from server |
cl_cmdrate 128 | Commands sent per second to server |
rate 786432 | Bandwidth rate (example for 128-tick servers) |
net_graph 1 | Display performance network stats |
You can also bind them to keys:
bind “F9” “net_graph 0”
bind “F10” “net_graph 1”
So you can toggle monitoring stats quickly.
When combining these commands, avoid duplicates. Always test each addition. A bad config can hurt more than help.
Sensitivity and Mouse Settings
DPI vs In-Game Sensitivity
In CS2, mouse sensitivity is a massive deal. It directly affects your aim precision, recoil control, and muscle memory. But to get it right, you need to understand the combination of DPI (dots per inch) and in-game sensitivity.
- DPI (Mouse Settings via Software/Hardware):
DPI is the hardware-level setting that tells your PC how many pixels your mouse moves for every inch it travels on your pad. Most pro players use 400 or 800 DPI—these values are low enough for precision yet high enough for quick reactions. - In-Game Sensitivity (CS2 Setting):
This multiplies your DPI to give the final movement speed in the game. For example:- 800 DPI × 1.5 in-game sens = 1200 eDPI
- 400 DPI × 2.0 in-game sens = 800 eDPI
- Ideal eDPI Range:
For CS2, an eDPI range of 800–1400 is optimal for most players. Lower eDPI allows for more precise crosshair placement, while higher eDPI offers faster turns (useful for entry fraggers or aggressive riflers). But be careful—too high, and you’ll overflick; too low, and you’ll miss quick targets. - Zoom Sensitivity:
Controls how fast your scope moves when using the AWP or scout. Default is 1.0. Most pros lower it slightly (e.g., 0.8–0.9) for better precision when zoomed.
Raw Input and Mouse Acceleration
- Raw Input:
Set this to On in CS2. It ensures the game reads direct mouse input without Windows interference (like acceleration or filtering). This leads to more consistent, responsive aiming. - Mouse Acceleration (Enhance Pointer Precision):
This feature changes how much your cursor moves depending on how fast you move your mouse. In shooters, this is terrible. Disable it both in Windows settings and in-game.- To disable in Windows:
Go to Control Panel > Mouse > Pointer Options → Uncheck Enhance Pointer Precision.
- To disable in Windows:
Recommended Settings from Pros
Most professional players fall into these settings:
- DPI: 400 or 800
- In-Game Sensitivity: 1.5 to 2.5
- eDPI Range: 800–1400
- Raw Input: On
- Acceleration: Off
- Polling Rate: 1000 Hz (check your mouse software)
You should test what works best for your playstyle. If you’re a flick-based AWPer, you might prefer slightly higher sensitivity. If you’re a rifler who values pinpoint aim, lower might suit better.
Always test new sensitivity settings for at least a few days before deciding—they take time to adjust, and frequent changes will only hurt your consistency.
Audio Settings and Sound Optimization
Best Headphones and In-Game Sound Settings
In CS2, audio can be just as critical as visuals. Footsteps, reloads, grenade pins—every sound provides vital info about your enemy. You want the clearest, most directional sound possible.
- Use Headphones, Not Speakers
Always play with closed-back, over-ear headphones for the best isolation and directional sound. Open-back headphones may sound better for music, but they leak audio and reduce focus. - Best Audio Settings in CS2:
- Audio Output Configuration: Choose Headphones (Stereo) unless you’re using software for surround emulation.
- Master Volume: Keep between 0.5 and 0.8—loud enough to hear subtle sounds without damaging your ears.
- Music Volume: Turn down or off—menu music, MVP music, and round start music can be distracting.
- Game Volume: 0.7–1.0 range is standard for sound clarity.
- Sound Quality: Set to High only if your PC can handle it. On lower-end rigs, use Low for FPS boost.
HRTF and 3D Audio Explained
HRTF (Head-Related Transfer Function) simulates 3D spatial audio—letting you distinguish if footsteps are above, behind, or to your left/right. CS2 includes HRTF built-in.
- Enable HRTF for Better Directional Sound
Head to settings and toggle Enable HRTF = On. It may sound slightly “hollow” at first but improves spatial awareness. - 3D Audio vs Stereo:
If you’re not using HRTF, stereo headphones still offer decent directional sound. Avoid enabling 3rd-party 7.1 surround sound unless you’ve tested it—it often adds confusion.
Footsteps and Positional Audio Tips
- Turn Off Audio Processing Software (Like Dolby Atmos / Nahimic)
These often distort CS2’s directional audio. Stick to native HRTF for accuracy. - Adjust EQ
If your headphones or sound card have EQ software, boost mid-high frequencies (~3-6 kHz) to make footsteps and reloading more pronounced. - Practice Sound Identification
Learn the difference between:- Walking vs. running
- Different surface footsteps (metal, wood, dirt)
- Planting vs. defusing
- Grenade bounce vs. drop
Mastering sound gives you a huge edge—especially when holding angles or retaking sites. With the right settings and awareness, you’ll often hear enemies before you see them.
Network and Netgraph Settings
How to Display Netgraph and Why It Matters
The net_graph is a crucial debugging and performance-monitoring tool in CS2. It shows your FPS, ping, server tick rate, packet loss, and more—all in real time.
- To enable it:
Open console and type:
net_graph 1
- Why Use It?
- Monitor FPS drops
- Track packet loss or choke
- Confirm if server is running 128-tick
- Identify ping spikes before they affect your aim
You can position it or make it less intrusive using commands:
net_graphpos 2
net_graphheight 64
net_graphproportionalfont 0
Commands for Reducing Lag and Ping
Low ping = better hit registration. Try these tips:
- Use Ethernet, not Wi-Fi
- Close all background apps using bandwidth
- Disable cloud sync tools (OneDrive, Google Drive)
CS2 Console Commands:
rate 786432
cl_cmdrate 128
cl_updaterate 128
cl_interp_ratio 1
cl_interp 0
- rate is the bandwidth cap (set to max).
- cl_cmdrate / cl_updaterate = sync commands/updates at 128 times per second (for 128-tick).
- cl_interp_ratio and cl_interp affect hit registration. Set to 1 and 0 for minimal delay.
Interp, Rate, and Cl Commands Explained
- rate: Maximum data transfer between you and the server. Set to 786432 (for 128-tick servers).
- cl_cmdrate / cl_updaterate: Number of updates your client sends and receives per second.
- cl_interp: Delay buffer to prevent stutter when packets arrive late.
- cl_interp_ratio: Multiplies your interp. At ratio 1 and interp 0, you get the lowest possible delay.
In general:
- Set
cl_interp_ratio 1andcl_interp 0for best responsiveness. - If experiencing jitter or missed shots, try
cl_interp_ratio 2.
These settings won’t increase your ping but will help stabilize gameplay and improve your bullet registry.
HUD, Radar, and UI Customization
Changing HUD Scale and Color
Your HUD (Heads-Up Display) shows health, ammo, radar, kill feed, etc. Optimizing it helps avoid distractions.
- HUD Scale:
Set this in Settings > Game > HUD Scale. Recommended:- 0.95 – 1.0 for large screens
- 0.8 – 0.9 for small displays
- HUD Color:
Choose a color that stands out—Cyan, Purple, Lime Green are popular. Avoid grey or dark tones. - HUD Background Alpha:
Controls transparency. Lower values mean a cleaner look; higher values increase readability in bright areas.
Best Radar Settings for Competitive Play
The radar is more important than people think. A tight, zoomed-in radar helps you see nearby enemies and teammates precisely.
Recommended Radar Settings:
- Radar Map Zoom: 0.4 – 0.6
- Radar Centering: Off (let radar follow player, not stay centered)
- Rotate Radar: On
- Radar Hud Size: 1.0
- Radar Icon Scale: 0.7 – 1.0
These settings let you spot enemies based on callouts or sound cues without losing track of your own position.
UI Settings for Better Visibility
- Color Mode: Set to “Vibrant” or similar for better contrast.
- Crosshair Preview: Use the settings menu to preview your crosshair against different backgrounds.
- Weapon HUD Position: Right or left, depending on dominant hand.
- Damage Indicator Position: Set in center of screen or slightly offset for visibility.
Your UI should never block your vision or compete with the crosshair. Keep it clean, colorful, and focused on essentials.
Launch Options for CS2
Best Launch Options for FPS and Stability
CS2 allows command-line launch options that help boost FPS or reduce stutter. Add these in Steam:
- Right-click CS2 → Properties → Launch Options:
-high -novid -tickrate 128 -nojoy -freq 240 +fps_max 0 +mat_queue_mode 2
What They Do:
-high: Launches game in high CPU priority-novid: Skips intro video-tickrate 128: Forces offline servers to run at 128 tick-nojoy: Disables joystick support (frees RAM)-freq 240: Sets monitor refresh rate+fps_max 0: Removes FPS cap+mat_queue_mode 2: Enables multithreaded rendering
These can vary depending on your setup. Test with and without each to see results.
How to Add Launch Options via Steam
- Open Steam Library
- Right-click on Counter-Strike 2 > Properties
- Under General, find Launch Options
- Paste the desired string there (as shown above)
- Close and relaunch CS2
Make sure no typos, and avoid duplicate commands from your autoexec.
Common Launch Option Myths Debunked
- “Launch options give you 100+ FPS boost!”
Not true for everyone. Some setups gain only 5–10 FPS. Launch options are tweaks, not miracles. - “-tickrate 128 makes MM servers 128-tick!”
Nope. That only affects offline servers. MM servers are 64-tick (unless Valve changes this). - “-nod3d9ex or -threads [number] still work”
These were useful in CS:GO but have no effect (or worse, cause issues) in CS2.
Use modern, CS2-relevant commands only.
Pro Settings and Configs
Settings Used by Top CS2 Pros
Pro CS2 players have one thing in common: consistency. They choose settings that offer peak performance, responsiveness, and visibility, then stick with them religiously. While hardware plays a role, it’s these small, consistent optimizations that elevate their gameplay.
Here are the most common settings across top-tier players:
- Resolution: 1280×960 or 1024×768 (4:3 stretched)
- Aspect Ratio: 4:3
- FPS Cap: None or 300+
- Mouse DPI: 400 or 800
- In-Game Sensitivity: 1.2 – 2.5
- Crosshair: Static, medium size, bright color (like green or cyan)
- Raw Input: On
- Multithreaded Rendering: Enabled
- V-Sync: Disabled
- Shadows & Anti-Aliasing: Low or off
- Radar Zoom: 0.4 – 0.6
- HUD Color: Custom bright
Where to Download Pro Config Files
Want to test out a pro’s setup? You can download config files from:
- prosettings.net
- csgoconfigs.com
- liquipedia.net
- Reddit communities (e.g. r/GlobalOffensive)
- Pro team websites or personal Twitch/YouTube channels
Just be sure to download from trusted sources—never run scripts from unverified sites. Look for .cfg files you can open with Notepad and inspect before using.
Pros vs Your Own Settings – What to Copy
Here’s the trick: Don’t blindly copy a pro’s full config. Your monitor, mousepad, hand size, and reaction style are different.
What to copy:
- Crosshair styles
- Resolution/Aspect ratio
- Sensitivity ranges
- Autoexec structure
What not to copy without testing:
- Mouse sensitivity (feel differs by DPI/mouse)
- Audio settings (based on headphones)
- Advanced binds (smoke throws, etc. may not match your keys)
Use pro configs for inspiration—not a shortcut. Test changes, tweak, and find what’s comfortable for you.
Troubleshooting Common CS2 Issues
FPS Drops and Stutters
CS2’s new Source 2 engine is still being optimized. If you’re facing random stutters or massive FPS drops, try the following:
- Lower video settings (especially shadows, shaders, FX)
- Use FSR or render scaling
- Disable Fullscreen Optimization
- Right-click CS2.exe > Properties > Compatibility > Check “Disable Fullscreen Optimization”
- Turn off Steam Overlay and GeForce Experience Overlay
- Cap your FPS using
+fps_max 300or set to monitor refresh rate + 20
Make sure to run background processes like Discord or Chrome with reduced hardware acceleration.
Crashes and Freezing Fixes
- Verify Integrity of Game Files
- Steam > Library > CS2 > Properties > Installed Files > Verify
- Update GPU drivers
- Turn off background apps
- Avoid overclocking if system is unstable
- Reinstall DirectX / Visual C++ Redistributables
Sometimes, even re-seating RAM or reinstalling CS2 can help with persistent crashes.
Settings Resetting – How to Prevent It
If your config resets every time you start CS2:
- Create an
autoexec.cfg - Add
+exec autoexec.cfgto Launch Options - Make config files read-only:
- Right-click
config.cfg> Properties > Check “Read-only”
- Right-click
This prevents CS2 updates or crashes from wiping your custom setup.
Tips to Maintain Consistent Performance
Update Drivers and Game Files
Always keep these up to date:
- GPU Drivers (NVIDIA/AMD official websites)
- Motherboard Chipset
- Windows Updates
- Steam Client & CS2
New patches often fix performance issues—especially post-launch for CS2.
Monitor Background Processes
Check Task Manager before launching CS2. Kill:
- Chrome (uses RAM)
- Windows Update / Indexing
- RGB software (Corsair, Razer, etc.)
- Game launchers (Battle.net, Epic)
Use Game Mode (ON) or Process Lasso to prioritize CS2.
Regularly Clean Your System and Cache
- Run Disk Cleanup and delete temp files
- Use CCleaner to clean registry & startup programs
- Empty Steam Shader Cache occasionally (especially after GPU driver updates)
If your system is clean and lightweight, CS2 will reward you with buttery-smooth performance.
Recommended Tools and Websites
Crosshair Generators and Config Builders
crashz Crosshair Generator Map (Steam Workshop)
These help you test dozens of crosshairs or build custom ones with preview tools.
Benchmarks and System Requirements Checkers
Can You RUN It (SystemRequirementsLab)
Useful to check if your PC is bottlenecked in CPU or GPU.
Forums and Communities for Settings Advice
- Reddit: r/GlobalOffensive, r/CS2
- HLTV Forums
- Steam Community Discussions
- FACEIT / ESEA Community
These places are gold mines for real-world performance fixes, launch options, and pro config debates.
Conclusion
Optimizing Settings = Winning More
In CS2, your mechanical skill is only part of the equation. The other half? Your setup. Poor settings lead to input lag, low visibility, inconsistent aim, and poor sound cues—all of which cost rounds.
We’ve covered everything:
- How to tweak your graphics for high FPS
- How to build the perfect crosshair
- What mouse settings pros use
- How to optimize audio for clutch plays
- Config commands, autoexec setups, and launch options
Whether you’re fragging in Premier mode or grinding FACEIT, the right settings give you an edge. But remember—comfort and consistency beat copying blindly. Use this guide to tune your setup, then lock it in.
Stick to your configuration, stop tinkering mid-match, and give yourself time to build muscle memory. You’ll start noticing better aim, smoother movement, and more confident plays.
See you on the scoreboard.
FAQs
What’s the best crosshair for beginners in CS2?
Start with a static, medium-sized crosshair in a bright color like cyan or green. Use cl_crosshairsize 5, cl_crosshairgap -2, cl_crosshairthickness 1 as a base.
How do I make CS2 run smoother on a low-end PC?
Lower resolution (e.g., 1024×768)
Set all graphics to low/off
Use FSR in performance mode
Turn off Windows background apps
Use launch options like -nojoy -high -novid
Can I copy a pro’s config and use it safely?
Yes, but only from trusted sites. And always check each command—don’t overwrite your resolution or sensitivity without testing.
What resolution do most pro players use in CS2?
Most use 1280×960 or 1024×768 with 4:3 stretched. It makes enemies wider and more visible while boosting FPS.
Are launch options still relevant in CS2?
Yes, but only a few options matter (-high, -nojoy, +fps_max 0). Many legacy CS:GO commands no longer apply.
